
TL;DR
A closet booth is mainly about reducing reflections and echo, not full soundproofing. Proper placement, the right materials, and ventilation are key to making your closet studio work well for vocals, podcasts, or voice-over work.
Imagine recording vocals in a tiny closet and thinking, ‘Why does this sound so boxy?’ Turns out, the secret isn’t just foam — it’s where you put it, what you surround it with, and how you breathe life into the space.
If you’re tired of muffled recordings or echoey messes, this guide is your blueprint. You’ll learn how to tame reflections, block outside noise, and set up a closet that actually sounds good — without spending a fortune.
From choosing the right mic to sealing the door, let’s turn that cramped closet into a professional-sounding sanctuary.Acoustic dampening
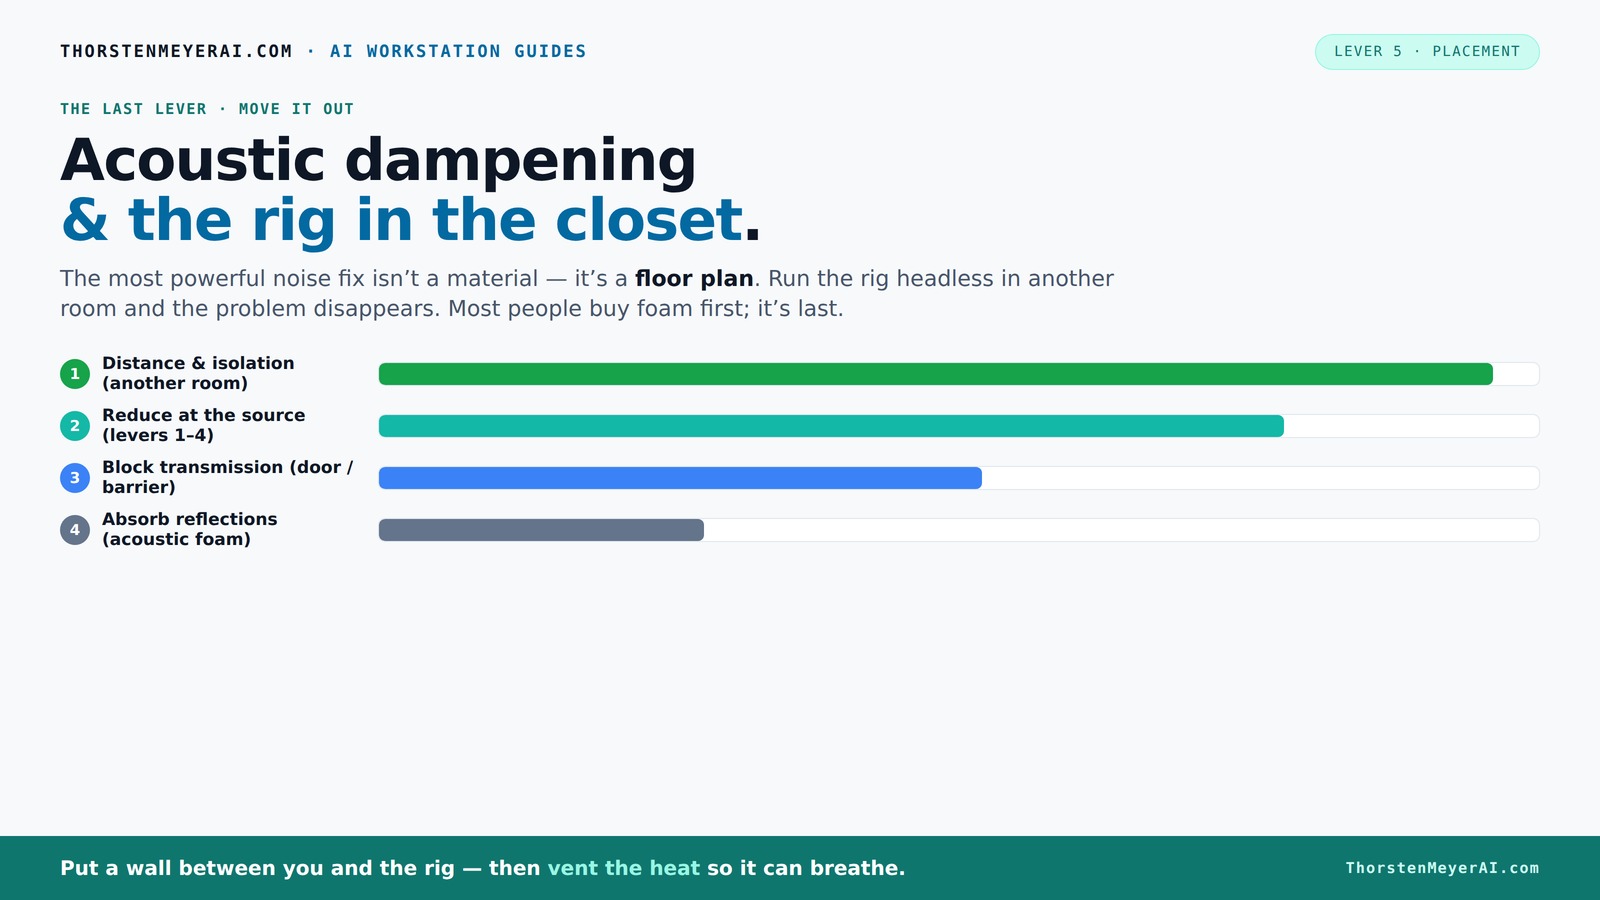
& the rig in the closet.
The most powerful noise fix isn’t a material — it’s a floor plan. A rig you can’t hear because it’s in another room beats any amount of foam. Tap the approaches in Part 1 to see what actually works.
(another room)
(levers 1–4)
(door / barrier)
(acoustic foam)
Contain the noise, not the heat
Key Takeaways
- A closet rig is perfect for voice, podcasting, and singing, but it’s not a full soundproof chamber.
- Target reflection points with absorptive materials like foam or blankets to reduce echo and improve clarity.
- Placement of the mic and treatment is more important than filling every wall with foam.
- Never fully seal your closet — proper ventilation prevents heat buildup and fan noise.
- Upgrading gear and adding bass traps or diffusers can dramatically improve your sound quality.

Focusound 52 Pack Acoustic Foam Panels 1" x 12" x 12" Sound Proof Foam Panles Soundproofing Noise Cancelling Wedge Panels for Home Office Recoding Studio with 300PCS Double-Side Adhesive
- Soundproofing Design: Triangular grooves for noise absorption
- Includes Adhesive Tape: 300pcs double-sided adhesive for easy installation
- Easy Shape Recovery: Soak in water to restore foam shape
As an affiliate, we earn on qualifying purchases.
As an affiliate, we earn on qualifying purchases.
What a closet rig is best for and what it isn’t
Closet rigs shine for voice-over, podcasts, and singing in a pinch. They excel at reducing echo and focusing sound, but they’re not full soundproof chambers.
Think of a closet as a focused "echo chamber" — it traps reflections, giving vocals a warm, intimate tone. However, sound from outside still leaks in, and loud sources can overwhelm the space.
Example: A YouTuber uses a closet for voice-overs, but still hears street noise through the door. It’s perfect for clarity, not for blocking all sound from neighbors.
How acoustic dampening in a tiny space really works
Acoustic dampening in small rooms is about controlling reflections and echo, not complete soundproofing. Soft materials like blankets, foam, and rugs absorb sound waves bouncing around. These materials reduce the energy of sound reflections, which helps prevent the room from sounding hollow or echoey. However, they do not prevent sound from escaping or entering the space, which is a different challenge.
Imagine throwing a blanket over a hard surface — it softens the sound and reduces harshness. But it doesn’t stop the sound from escaping or entering, meaning external noise can still be heard and your sound can still leak out. The goal of dampening is to improve clarity and focus inside the room, not to isolate it completely.
Understanding this distinction is crucial because it influences how you treat your space. Over-dampening with excessive materials can deaden your sound unnaturally or make the space feel cluttered, while under-treatment leaves reflections and echo. The key is strategic placement—targeting the main reflection points to optimize clarity without overstuffing the room. This balance allows you to achieve a natural, professional sound that captures your voice accurately without unwanted room coloration.
Where to place your mic and how to treat reflection points
The best placement for your mic in a closet is away from walls and corners — ideally, a few inches from a foam panel or a soft surface. This minimizes unwanted reflections that color your sound. Proper placement reduces the chance of picking up reflected sound waves that can cause a muddy or echoey recording. Acoustic dampening in small rooms is about controlling reflections and echo, not complete soundproofing.
Start by placing the mic at face level, with the source (your voice) directly facing it. Use a shock mount to prevent vibrations from reaching the mic. Then, identify the main reflection points—these are usually the surfaces directly opposite or adjacent to the mic where sound is likely to bounce back. Treat these points with foam or blankets to absorb these reflections. For more tips, see placement and treatment strategies.
For example, if your closet has a hard door, treat the wall around the door frame with foam or blankets, and hang a panel behind your mic to catch bouncing sound. This targeted approach ensures your voice is captured cleanly, with fewer echoes and room noise contaminating the recording.
Understanding the why behind these placements is vital: placing the mic correctly and treating reflection points prevents your recordings from sounding hollow or echoey. It’s a tradeoff—effective placement reduces unwanted room coloration but requires careful attention to positioning and treatment to avoid over-dampening or creating new reflection issues. This method ensures your recordings are clear, natural, and professional-sounding.
Common mistakes that ruin your closet sound
Many DIYers make these slip-ups: sealing the closet door completely without ventilation, placing the mic too close to a wall, or overusing foam panels without considering reflection points. These mistakes can lead to muffled sound, heat buildup, or a lack of clarity. For more on proper setup, see rig setup tips.
Another mistake? Ignoring low-frequency buildup — bass traps or corner treatment are often overlooked but crucial in small spaces. Without proper low-end treatment, recordings can sound boomy or muddy, especially when speaking or singing at higher volumes. Recognizing these issues and addressing them with appropriate treatment and ventilation ensures your closet rig performs optimally and produces professional-sounding results.
Additionally, neglecting the importance of proper airflow can lead to heat buildup, which not only affects your comfort but can also damage sensitive equipment over time. The tradeoff here is between airtightness for sound isolation and maintaining enough ventilation for safety and equipment longevity. Avoiding these common pitfalls by balancing sound treatment with ventilation and low-end management is essential for a functional, high-quality closet studio.
DIY tips for building a better closet studio on a budget
Start simple: hang blankets and foam panels at reflection points, seal gaps around the door with weatherstripping, and use a soft rug on the floor to tame reflections. For more budget-friendly ideas, visit DIY closet studio tips.
Here’s a quick list:
- Use old blankets or moving pads — cheap and effective for absorbing sound.
- Place foam panels at mirror points (where sound bounces back from the mic).
- Seal gaps around the door with draft stoppers or blankets to prevent sound leaks.
- Add a soft rug or carpet for the floor and some foam on the ceiling to reduce reflections from below and above.
- Ensure ventilation by installing a small exhaust fan or vent — never fully seal it to allow airflow and prevent heat buildup.
This approach significantly improves clarity and reduces echo, making your recordings sound more professional without a big budget. Remember, the goal is to strike a balance: enough dampening to control reflections but maintaining airflow for safety and comfort. Simple, strategic treatments can make a noticeable difference, and you can always upgrade gradually as your needs evolve.
Upgrades that make your closet rig sound even better
Once you’ve got a basic setup, upgrading your gear and treatment can push your sound to the next level. Better equipment and targeted acoustic treatments address specific issues and improve overall clarity and warmth.
Consider these:
- Invest in a quality mic and shock mount for cleaner, more consistent recordings. High-quality gear reduces noise and captures your voice more accurately.
- Add bass traps in the corners to tame low-end buildup, which can muddy your sound, especially at higher volumes or with certain voice types.
- Upgrade to a dedicated soundproof door or install acoustic door seals to reduce outside noise intrusion.
- Use a professional-grade diffuser or absorber on the ceiling for better sound diffusion, reducing flutter echoes and improving spatial sound.
- Improve ventilation with thermostatically controlled exhaust fans to keep heat down and noise out, maintaining a comfortable and quiet environment.
Remember: the right upgrade depends on your specific needs and budget, but each can significantly enhance your recording quality and comfort. Carefully selecting upgrades based on the issues you encounter will ensure your space continues to improve without unnecessary expense.
How to keep your closet cool and ventilated
Proper ventilation turns a heated closet into a safe, quiet studio. Without it, heat builds up, throttling your GPU and making noise worse. Overheating can also damage equipment and create an uncomfortable environment, which can negatively impact your focus and performance.
Here’s what works:
- Install a quiet exhaust fan or vent that pulls hot air out, maintaining a stable temperature.
- Leave a small gap or vent opening for passive airflow, allowing fresh air to circulate naturally.
- Use ducting to direct hot air outside if possible, especially in small or enclosed spaces.
- Monitor temperature regularly with a digital thermometer to ensure your environment stays within safe ranges.
- Pair ventilation with an AIO liquid cooler for your PC to move heat efficiently out of the space, which also reduces noise and prevents overheating.
Effective airflow prevents heat-related issues that can compromise both your equipment and your comfort. It also helps maintain a quieter environment, as fans and ventilation systems can be chosen for their low noise profile. Balancing ventilation with soundproofing is key: too much airflow can introduce noise, but insufficient ventilation risks overheating and equipment failure. Regularly checking temperatures and adjusting ventilation accordingly ensures your closet remains a safe, quiet, and effective recording space.
Frequently Asked Questions
Is a closet booth good enough for voice-over, podcasting, or vocals?
Yes, a well-treated closet can produce professional-sounding vocals and podcasts. It’s about controlling reflections and noise, not full soundproofing. Proper placement and absorption make all the difference.What is the difference between acoustic dampening and soundproofing?
Acoustic dampening reduces reflections, echo, and reverb inside a space. Soundproofing blocks outside noise from entering and prevents sound from leaking out. They’re related but serve different purposes.Should I use foam, moving blankets, or acoustic panels?
Use a combination. Foam panels are great at reflection points; blankets help fill larger gaps and corners. Acoustic panels are more durable and effective for high-frequency absorption. Each has a role in a balanced setup.Where should I place the mic inside the closet?
Position the mic about 6-12 inches from your mouth, facing outward, with the reflection points behind and to the sides treated with foam or blankets. Keep it away from walls and corners for cleaner sound.Do I need bass traps in a closet studio?
If your recordings sound boomy or muddy, especially at low frequencies, adding bass traps in the corners can help. In small spaces, low-end buildup is common and needs targeted treatment.Conclusion
Transforming a closet into a quiet, clear recording space isn’t about magic — it’s about smart placement, targeted dampening, and good airflow. Think of your closet as a focused tool to reduce echo, not a fortress of silence.
Remember: the best soundproofing? Distance. Keep your rig in a different room, and your ears will thank you for it. Now, go build your perfect closet studio and record like a pro.